
March in Ellington is a deceptive time for a roof. We're currently sitting at 44°F under a heavy cloudy sky, and while it feels like the worst of winter is behind us, this is actually when I see the most "mysterious" leaks. It's the classic Tolland County thaw—snow melts off the high points of your roof, pools against the chimney masonry, and then freezes again as the sun goes down. If your flashing isn't 100% watertight, that expanding ice acts like a crowbar, prying the metal away from the brick. I've spent the morning looking at three different Cape Cods near Ellington High School, and all of them had the same culprit: failing chimney flashing.
Key Takeaways
- Most chimney leaks in Ellington occur during the March freeze-thaw cycle, not during heavy summer rain.
- "Roofers in a tube" (caulk) is a temporary fix that usually fails within 14 months in Connecticut's climate.
- Proper flashing requires a two-part system: step flashing and counter-flashing.
- A proactive flashing repair typically costs $900-$1,600, while waiting for a ceiling collapse can triple that price.
The Ellington Thaw: Why March is the Danger Zone
Here's the thing about our local weather right now: that 27% humidity and 8 mph wind are drying out the surface of your shingles, but they aren't doing a thing for the moisture trapped behind your chimney's shoulder. In Ellington, we have a lot of older brickwork that is naturally porous. When we hit these 44°F afternoons, the moisture travels deep into the mortar.
The Physics of the Leak
I recently visited a home near Crystal Lake where the owners were baffled by a water stain in their living room. Their roof was only eight years old. When I got on the deck, I found that the original installers had used a single strip of "L-flashing" rather than proper step flashing. As the chimney settled—which they all do—the metal pulled away. Every time the snow melted this week, water was channeled directly behind the siding.
Chimney flashing failure in Ellington
Ice, brick, and metal working against each other during the March freeze-thaw cycle
The Anatomy of a Proper Chimney Seal
Look, most homeowners think flashing is just a piece of metal tucked under the shingles. It's actually a sophisticated water-shedding system. If a contractor tells you they can "just reseal it with some Henry's," you should probably show them the door.
Step Flashing vs. Counter-Flashing
You need both. Step flashing consists of individual "steps" of metal woven into each course of shingles. Counter-flashing is the metal that is physically ground into the mortar joints of the chimney itself. This creates a redundant shield. My crews use 24-ounce copper or heavy-gauge aluminum for this because the thin stuff the big-box stores sell will warp in the Connecticut sun. That intersection is also where the I-Codes from the International Code Council expect real mechanical integration—not a bead of caulk slathered on for the photo. According to the U.S. Department of Energy guidance on insulation and the building envelope, maintaining the integrity of your roof transitions is also vital for your attic's thermal envelope—leaky flashing often leads to damp insulation, which kills your R-value.
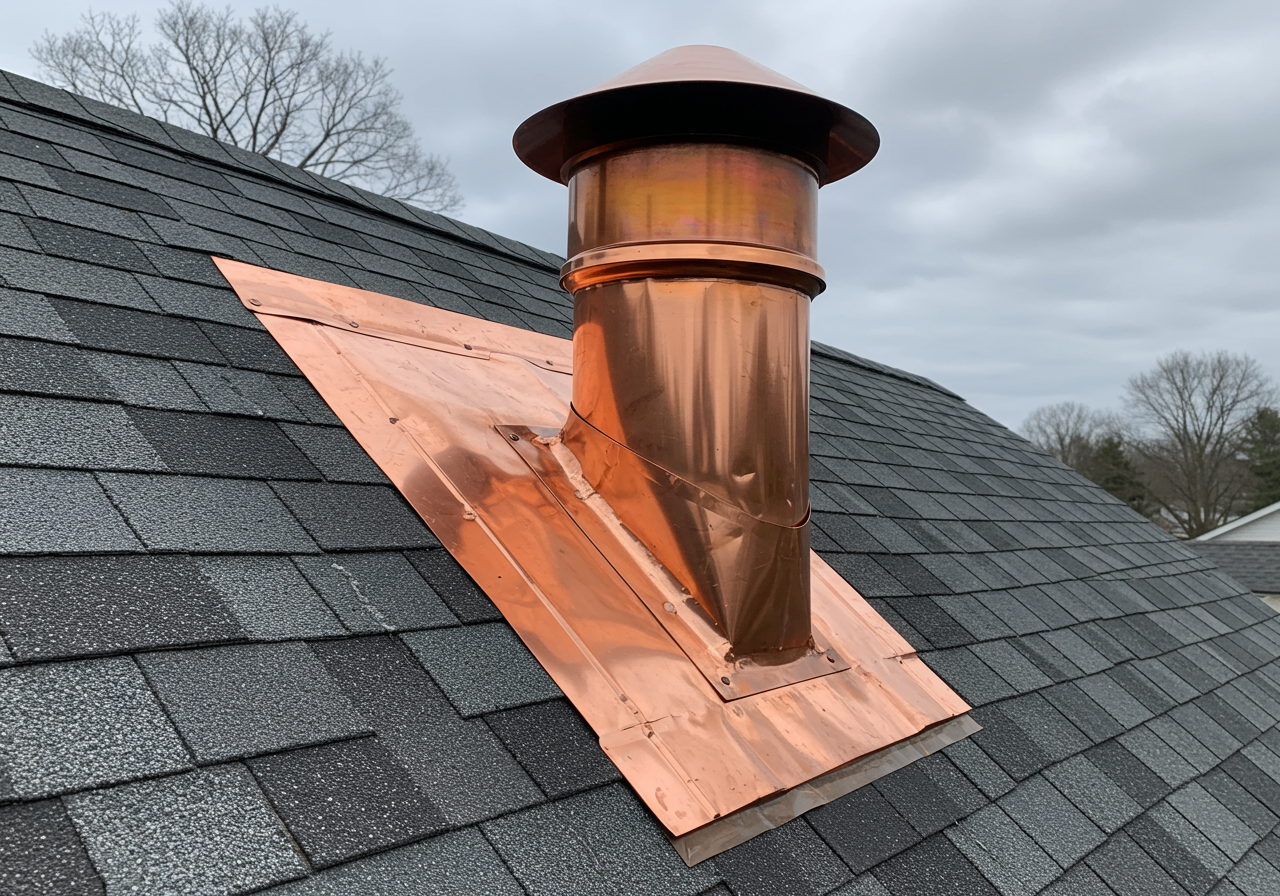
Material Matters: Why I Prefer Copper in Tolland County
In my field notes from the last decade, I've tracked the longevity of different metals. While aluminum is standard, I often recommend copper for Ellington's historic or high-end colonial homes. It's not just about the look; it's about the thermal expansion coefficient. Copper moves with the brick better than aluminum does.
Chimney Flashing Material Comparison
| Feature | Aluminum | Copper | Galvanized steel |
|---|---|---|---|
| Rust resistant in Connecticut's climate | |||
| Soldered joins typical for watertight seams | |||
| Lower upfront material cost | |||
| 50+ year service class when installed properly |
In practical terms, that usually maps to roughly 20–25 years for quality aluminum, 50+ years for copper, and a shorter 10–15 year window for standard galvanized assemblies unless they're exceptionally well maintained.
Why "Goop" Isn't a Real Repair
I've seen it a thousand times: a "handyman" goes up with a bucket of tar and slathers it over the old metal. In our 44°F weather, that tar is rigid. By the time we hit July, it'll be baking at 140°F. This constant expansion and contraction causes the tar to crack within one or two seasons.
The Cost of a "Cheap" Fix
A bucket of sealant costs $30. A proper masonry-grind counter-flashing job might cost $1,412. However, that $30 fix often leads to $5,000 in interior drywall repair, mold remediation, and structural rot. I always tell homeowners to verify their contractor's license and ask specifically if they "grind the reglet" (the groove in the brick) or just caulk to the surface. If they don't grind, it isn't a permanent repair.
Inspecting Your Chimney Without a Ladder
You don't need to risk your neck to spot trouble. Grab a pair of binoculars and stand in your driveway. Look at the base of the chimney.
Red Flags to Watch For
- Gaps: Can you see daylight between the metal and the brick?
- Staining: Are there dark "weep" marks on the brick below the metal?
- Rust: If you see orange streaks, you have galvanized steel flashing that has reached its expiration date.
- Peeling Paint: Often a sign that moisture is trapped behind the metal.
If you're noticing these signs, it's worth browsing our library of roofing guides to see how these small issues can snowball into major structural problems. I've seen chimneys in Ellington literally start to lean because the internal wood framing rotted away from a slow, ten-year flashing leak.
The Long-Term ROI of a Proper Reseal
Investing in your chimney flashing is effectively "leak insurance." When we perform a full tear-off and replacement of the flashing, we ensure that the roof-to-wall transition is armored against the worst nor'easters. Even for homes with "cool roofs" designed for energy efficiency, the EPA's research on how cool roofs reduce urban heat emphasizes that the system only works if the envelope is sealed.
Strip to sound deck
Remove existing shingles and old metal down to the roof deck.
Ice and water shield
Install high-temperature ice and water shield around the chimney base.
Weave step flashing
Interleave new step flashing with each new shingle course.
Cut the reglet
Grind a 1-inch deep reglet into the chimney mortar joints.
Lock counter-flashing
Insert custom-bent counter-flashing and lock it into the masonry with lead wedges.
Seal the joint
Seal the reglet with high-grade polyurethane sealant.
If you're unsure about the state of your roof, don't wait for the next storm. You can see what other CT homeowners experienced when they finally tackled these "hidden" problems before they became emergencies.
Get Your Free Roof Quote
Enter your zip code to get started
March is the time for vigilance. That 44°F cloudy weather might seem calm, but your chimney is likely working harder than you think to keep the water out. Make sure it has the right armor to do the job.