
Key Takeaways
- The Connecticut State Building Code requires roofs in Chester to withstand wind speeds of up to 130 mph, necessitating specific fastening patterns.
- Installing a secondary water barrier can prevent up to 95% of interior water damage if shingles are stripped during a storm.
- The difference between a standard 4-nail installation and a hurricane-rated 6-nail pattern is often the deciding factor in storm survival.
- January is the ideal time for a structural attic audit to check for proper rafter bracing before the Atlantic hurricane season begins.
Are you confident your Chester home could withstand a Category 2 hurricane if it tracked up the Connecticut River tomorrow afternoon? Most homeowners I talk to in Middlesex County assume that because their roof survived a few rough winters, it's prepared for a shoreline wind event. The reality is quite different (and often much more expensive). While January might feel like the time to worry about snow loads, it is actually the strategic window for hardening your home against the high-velocity winds that define our coastal-adjacent geography.
1. Understanding Chester's Coastal-Adjacent Wind Zones
Here is the reality: Chester sits in a unique "transition zone" where the Connecticut River valley can actually funnel and accelerate wind speeds during a major storm. According to the International Code Council (ICC), Chester is subject to specific wind-borne debris region requirements that differ significantly from inland towns like Simsbury or Avon. When I'm out near the Chester-Hadlyme Ferry area, I see roofs that were installed to "standard" specs, but standard isn't enough when you're dealing with the 130 mph gusts required by CT state code. I've seen cases where two houses side-by-side had completely different outcomes because one homeowner insisted on a "Coastal Grade" installation. It isn't just about the shingles; it's about the aerodynamic pressure that builds up on the leeward side of your house. If your roof isn't tied down correctly, that pressure acts like an airplane wing, literally trying to lift the structure off the walls.
2. The Six-Nail Rule: Precision Over Speed
The most common failure point I document in my field notes isn't the material failing—it's the fastener placement. In a standard installation, most crews use four nails per shingle. However, for hurricane preparation, a high-wind fastening pattern (six nails) is non-negotiable. I recently inspected a home near the Pattaconk Reservoir that lost a third of its roof in a localized microburst. The shingles were high-quality, but the nails were driven too high, missing the "common bond" area where the two layers of the shingle overlap. This essentially reduced the wind rating of a 130 mph shingle to about 60 mph. My crews don't just "aim" for the nail line; we use chalk lines or pre-marked guides because a deviation of just half an inch can be the difference between a secure roof and a $15,000 insurance claim. If you want to ensure your next project is handled by professionals who respect these tolerances, you can how our matching process works to see how we vet local experts.
Conduct a perimeter inspection
Check for loose or curling shingles around the edges of your roof, as these are the most vulnerable to wind uplift.
Ensure the drip edge is secured
Verify that the drip edge is fastened every 4 inches with roofing nails, not staples.
Verify hurricane straps
Check that the attic has hurricane straps (H-clips) connecting rafters to wall plates for structural integrity.
Apply roofing cement
Apply a bead of roofing cement under the first course of shingles for extra seal against wind-driven rain.
Seal all flashings
Seal all pipe boots and chimney flashings with high-grade polyurethane sealant to prevent water intrusion.
3. Synthetic Underlayment vs. Felt: The Secondary Barrier
Think of your shingles as your primary armor and your underlayment as your last line of defense. In the "old days," we used 15-lb or 30-lb organic felt paper (which is basically paper soaked in asphalt). The problem? If shingles blow off, that felt paper tears instantly under high wind pressure. I always recommend a high-performance synthetic underlayment, specifically something like GAF Tiger Paw or Owens Corning Deck Defense. These materials are nearly impossible to tear by hand. More importantly, I'm a big advocate for "taped seams." By using a specialized flashing tape on every joint of the underlayment, you create a "sealed roof deck." Even if every single shingle blows off your house during a hurricane, the interior of your home stays dry. I've seen this save homeowners upwards of $40,000 in interior renovation costs.
Roof Underlayment Storm Resistance
| Feature | Traditional Felt | Taped Synthetic |
|---|---|---|
| High Wind Tear Resistance | ||
| UV Exposure Rating (90 Days) | ||
| Water-Tight Without Shingles | ||
| Walkability/Safety |
4. Securing the Perimeter: Edge Metal and Drip Edge
Hurricane winds don't start in the middle of your roof; they start at the edges. If wind can get under the "drip edge" (the metal flashing at the eave), it creates a peeling effect. FEMA's hurricane mitigation guidelines emphasize that the perimeter of the roof is the most vulnerable area. In Chester, where we have a lot of mature tree cover, the wind turbulence can be even more erratic. I've found that many local installs skip the essential step of "nailing the rake." You need a heavy-gauge drip edge (24-gauge steel or .032-inch aluminum) fastened every 4 inches. I personally prefer a "cleat" system for the edges, which locks the metal down so it can't be pried up by the wind. It's a small detail that adds maybe $300 to a job but prevents a total roof failure.
Never use staples for roof installation in Chester
5. The Gutter Factor and Wind Uplift
People often forget that gutters are part of the roof's aerodynamic profile. In January, gutters in Chester are usually full of ice or leftover autumn oak leaves. If a heavy gutter pulls away from the fascia, it exposes the edge of the roof deck to wind. Once the wind gets into the soffit or under the roof deck, the "internal pressure" of the house increases, which can literally blow the roof off from the inside out. (This is basic physics, but it's rarely discussed at the kitchen table during a sales pitch). I recommend hidden gutter hangers with 3-inch screws driven directly into the rafter tails, not just the fascia board. This provides a structural connection that can withstand the weight of ice and the force of hurricane-force updrafts.
"I've spent a lot of time in attics after storms. The roofs that stayed on always had one thing in common: the contractors didn't cut corners on the 'invisible' components like hurricane clips and edge fastening."
6. Investing in Resilience: The Financial Reality
Let's talk numbers. A "standard" roof replacement in Chester might run you around $12,500 for a 2,000-square-foot home. Adding hurricane-grade upgrades—synthetic underlayment, taped seams, 6-nail patterns, and heavy-duty drip edges—usually adds about 10% to 15% to that total ($1,250 to $1,875). However, consider your insurance deductible. Many CT policies now have a "windstorm deductible" which is a percentage of your home's value (often 2% to 5%). If your home is insured for $500,000, your out-of-pocket cost for a storm claim could be $10,000 before the insurance kicks in a dime. By spending an extra $1,500 now, you aren't just protecting your shingles; you're shielding yourself from that massive deductible. Before you commit to a project, get an instant roof estimate to see how these resilience upgrades fit into your budget. It's the smartest money you can spend on a Chester home.
Did You Know?
A simple way to check your roof's storm readiness is to look for 'daylight' in your attic. If you see light coming through the eaves, wind can get in too. Properly installed 'baffles' and sealed soffits are essential for wind-driven rain protection.
Get Your Free Roof Quote
Enter your zip code to get started
The Conclusion
Preparing your Chester roof for a hurricane isn't about hope; it's about engineering. From the precision of the six-nail pattern to the structural integrity of a taped synthetic underlayment, every layer of your roof serves a specific purpose in the battle against 130 mph winds. Don't wait until a named storm is churning up the coast to wonder if your contractor followed the CT building code. Take the time this January to inspect your perimeter, clear those gutters, and consider a resilient upgrade for your next replacement. If you're ready to find a local professional who understands these shoreline requirements, we're here to help you make a data-driven decision for your home's future.
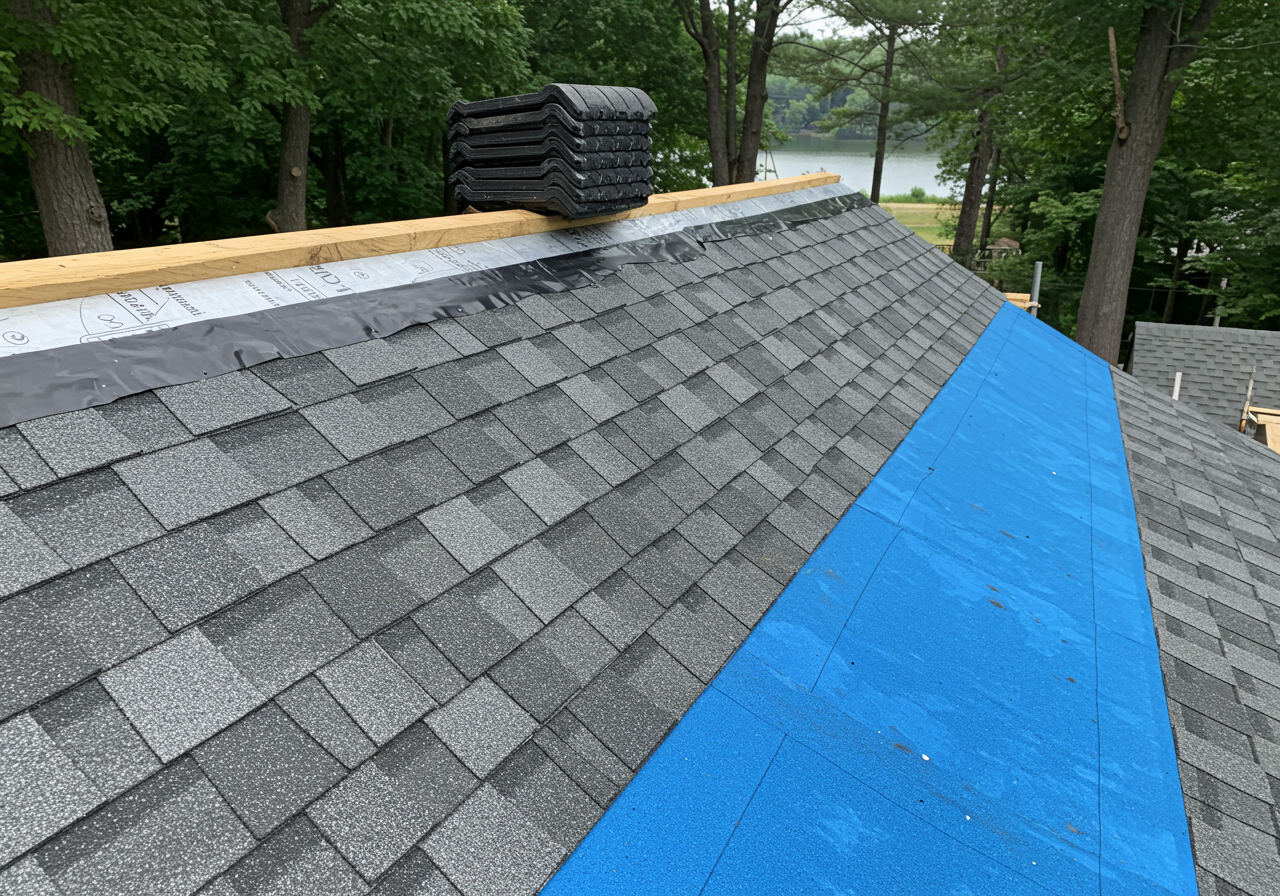
Hurricane-resistant roofing installation in Chester, CT
Proper fastening patterns, synthetic underlayment, and reinforced edges are essential for protecting homes against 130 mph winds in Connecticut's coastal-adjacent zones.